Hello to all you stashbusting superstars! Thanks so much to Robin for letting me guest post today! I'm so excited to be part of the second Stashbusting September contest – such a great idea because if you're anything like me, you just keep adding to your stash with those great deals you just can't pass up and instead of doing projects you need to find more space to store your stash!
Today I want to share a pretty quick and easy project with you – it's both stashbusting and upcycling!
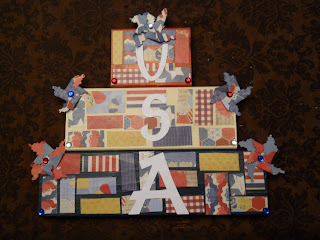
I took these cushion covers that I got from my friend's mom
and turned them into curtains for these windows in my boyfriend's basement suite (which he will be renting out shortly...p.s. the suite is another story for another time though!)
** I will preface this tutorial with a disclaimer: my sewing “skills” come from about 2 years of high school home economics and anything else that I've picked up along the way. Are there better ways to do this project? Probably, this is just the way that I chose to muddle through! **
First I had to tear the darn things apart. Not the easiest task because these were actually put together pretty well – first they sewed the cording to one side of the cushion, then sewed both sides together, and then serged around all of it! There was a lot of seam ripping and thread everywhere!
Now you have your two pieces of fabric, a zipper, and a heck of a lot of cord! (to be saved for another project someday, sometime...)
Because each half wasn't long enough to cover the window (I needed them to be around 20" finished), I had to add some length to the bottom. I took one panel and cut it right up the middle.
If you want the "math" here the top section was about 18" and you're going to have a take about 1.5" of that off the finished length for the top casing. Then the bottom section is where you make up the rest of your finished length, here I was going for 20" so I needed 3.5" for the bottom part, double that and add 1/2 and inch for the complete bottom piece of fabric.
I then pinned this piece to the bottom of the other half. Make sure that if you're using a pattern or stripes that you match them up at the bottom.
Or at least reasonably match them up...
I had to take this one apart...
Sew the two pieces together with ¼ to ½ inch seam allowance.
Now you're going to serge, or in my case, zig zag around the entire curtain to finish off your seams.
I'm going to go off on a brief tangent and talk about my sewing machine situation. I used to have this fancy dancy machine to work with. It was my grandma's, she had bought it shortly before getting sick and having to be moved into a nursing home.
She never had a good opportunity to learn how to use it, and in her current state in the home, doesn't really have the capacity to make good use of it. Long story short, there were some family arguements, and now the lovely thing lives at the nursing home with my grandma. :(
I now have to resort back to my mom's old sewing machine. And I mean old. It still works well, but sometimes doesn't like to cooperate with finicky fabrics.
It had been so long since I used it that I had to get out the manual to figure it all out. If you're new to sewing my best advice to you is READ YOUR MANUAL! Really. Almost everything you need to know is in there.
I love this picture...you can see how the thread has rubbed so much from use that it's left marks!
Alright....back to the matter at hand!
Now what you want to do is sew in your two sides. I followed the original seams where the cushion had been sewn originally. Iron them down, and you may or may not need to pin them...I'm not much of a pinner... unless we're talking about pinterest....but again, getting side tracked!
Now you're almost done.
Fold the top over about 1½ inches. Sew along the bottom.
This is the casing for your curtain rod. If you have a larger rod, you might want to make this a little bigger. If you want to get fancy, you can first fold the top down ¼ inch and THEN fold it down 1½ inches so that your unfinished edges are to the inside. Because these are just for a basement suite, I didn't really care.
Now, you're going to fold up your bottom piece to add a bit of weight to your curtain.
I pressed the bottom edge up a ¼ inch and then brought this up to the seam where we joined the two pieces. Pressing the seam where you joined them down, pin the bottom edge just above the seam so that it's hidden. You're probably going to want to pin this one.
(here I've shown this with the bottom not brought all the way up so that you can see where it's going to go)
Sew in the bottom in the “ditch” of where you joined the two panels...or as close as possible.

And the reverse looks like this:
Any you're done!
Now hang your curtains in your windows! Ta da!
(okay, this isn't the real window they're going in, but you get the idea! AND it gave me the idea that this would also work to make cute little bistro style curtains too!)
Thanks again to Robin for running this awesome event! I can't wait to see what everyone comes up with! I have a whole bunch of projects up my sleeve so make sure to check back often over at envirocraftiness!


Comments